My CI/CD Docker workflow for Jekyll using AWS CodePipeline and CodeBuild
Note: Amplify Console simplifies a lot of this and makes most of this redundant. I’m currently in the process of migrating this site from Jekyll to Gatsby and will be using Amplify.
I’ve been meaning to write this post for awhile now. A lot of this is from memory, since I didn’t have the time to document and take verbose notes at the time when I was figuring all of this out. So while it may be light on historical details (why I did certain things a certain way), it will be technically accurate for how you can get a similar CI/CD pipeline working using AWS CodePipeline and CodeBuild for your Jekyll blog.
Creating a build container
The first thing I needed was a Dockerfile to use as my build container. I ran into a few issues trying to use the current Ruby (v2.5.3) that CodeBuild provides in the AWS console and the version of Jekyll that I have defined in my Gemfile. I don’t want to go into a lot of details about what those issues were, but I set off down the path to create my own Docker image so that I wouldn’t have to troubleshoot Ruby Gem issues. This also has the side effect of making the actual builds much faster (since I don’t have to pull down and install the Gems every time into the build container).
AWS doesn’t have a build container for the version of Ruby (2.3.1) that I use, so I had to do some searching. I came across this page which led me to this Dockerfile on GitHub.
I took this Dockerfile and added what I needed to build my own Docker image with the Gems needed by Jekyll and my blog:
Generate locale
RUN locale-gen en_US.UTF-8
Copy gemfile and install dependencies
WORKDIR /usr/site
COPY Gemfile /usr/site/ COPY Gemfile.lock /usr/site/
RUN bundle install
RUN s3_website install
You can see my full Dockerfile on the repo for my site. I then built this image and pushed it to Amazon ECR so that I could use it in my CodeBuild project.
I will say that while I was working on this, these instructions on how to test and debug locally with CodeBuild were extremely helpful. Before we had this, the cycle times for debugging how to actually get a working CodeBuild build project were really long.
Creating the buildspec file
CodeBuild uses a buildspec.yml file in the root of your project for instructions on what commands to run to perform your build. Mine is pretty self-explanatory. It did take some research to figure out what environment variables were necessary to address Jenkins build issues, so definitely check that out. The Rakefile was unchanged when I moved this project to CodeBuild, but you might want to check it out if you’re not as familiar with how to invoke Jekyll.
Setting up the build project
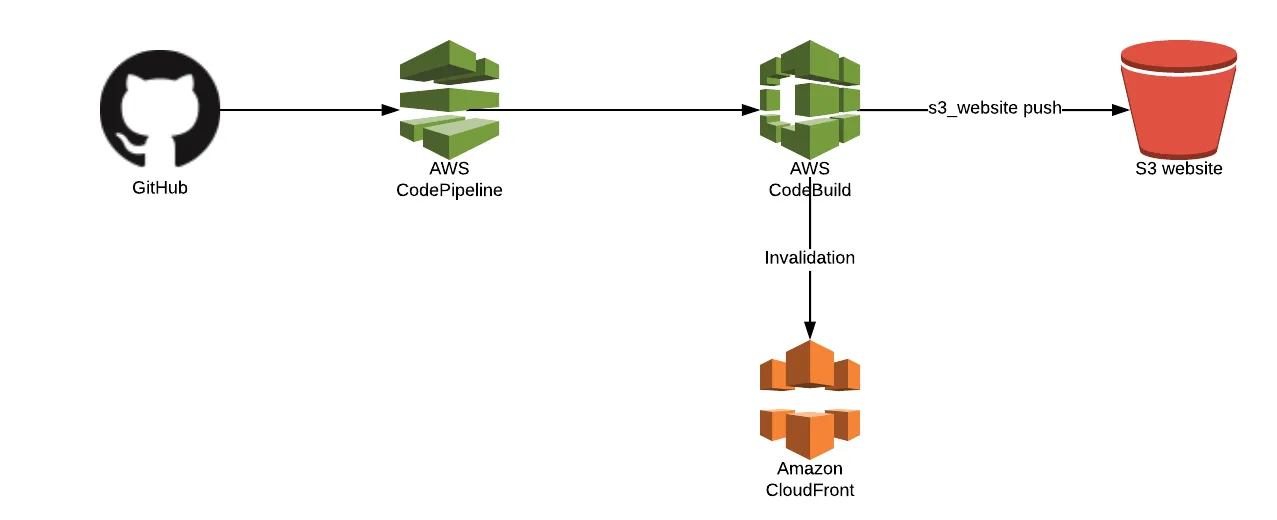
The pipeline for this project is actually pretty simple—it just consists of a source and a build. We do our actual deployments to S3 during the build process because we need the help of the s3_website project to do our actual deployment. You can use the AWS console or CLI to create a new build project. Here are the settings from my project (I used the CLI command aws codebuild batch-get-projects --names <projectname> to generate this):
{
    "projects": [
        {
            "name": "JekyllBuild",
            "arn": "arn:aws:codebuild:us-east-1:000000000000:project/JekyllBuild",
            "description": "Build project for personal blog www.ronnieeichler.com powered by Jekyll",
            "source": {
                    "type": "GITHUB",
                    "location": "https://github.com/ranrotx/ronnieeichler-site.git",
                    "gitCloneDepth": 1,
                    "reportBuildStatus": false,
                    "insecureSsl": false
                },
                "secondarySources": [],
                "artifacts": {
                    "type": "S3",
                    "location": "<artifactbucket>",
                    "path": "jekyll-builds/",
                    "namespaceType": "NONE",
                    "name": "JekyllBuild",
                    "packaging": "ZIP",
                    "overrideArtifactName": true,
                    "encryptionDisabled": false
                },
                "secondaryArtifacts": [],
                "cache": {
                    "type": "NO_CACHE"
                },
                "environment": {
                    "type": "LINUX_CONTAINER",
                    "image": "<accountid>.dkr.ecr.us-east-1.amazonaws.com/buildenvs/jekyll-ruby-2.3.1:latest",
                    "computeType": "BUILD_GENERAL1_SMALL",
                    "environmentVariables": [],
                    "privilegedMode": false
                },
                "serviceRole": "arn:aws:iam::<accountid>:role/service-role/codebuild-JekyllBuild-service-role",
                "timeoutInMinutes": 15,
                "queuedTimeoutInMinutes": 480,
                "encryptionKey": "arn:aws:kms:us-east-1:<accountid>:alias/aws/s3",
                "tags": [],
                "created": 1545537207.02,
                "lastModified": 1545539257.625,
                "badge": {
                    "badgeEnabled": false
                }
            }
        ],
        "projectsNotFound": []
    }
The location of the image in the project definition is the location where I pushed my custom Docker image to ECR in the previous steps. I also created the service role above so that when my build runs, it has permission to be able to publish to the S3 bucket where my content lives and perform the CloudFront invalidation. Here are the IAM policies used in that role:
CodeBuildBasePolicy
    {
        "Version": "2012-10-17",
        "Statement": [
            {
                "Effect": "Allow",
                "Resource": [
                    "arn:aws:logs:us-east-1:000000000000:log-group:/aws/codebuild/JekyllBuild",
                    "arn:aws:logs:us-east-1:000000000000:log-group:/aws/codebuild/JekyllBuild:*"
                ],
                "Action": [
                    "logs:CreateLogGroup",
                    "logs:CreateLogStream",
                    "logs:PutLogEvents"
                ]
            },
            {
                "Effect": "Allow",
                "Resource": [
                    "arn:aws:s3:::codepipeline-us-east-1-*"
                ],
                "Action": [
                    "s3:PutObject",
                    "s3:GetObject",
                    "s3:GetObjectVersion"
                ]
            },
            {
                "Effect": "Allow",
                "Resource": [
                    "arn:aws:s3:::<artifactbucket>/*"
                ],
                "Action": [
                    "s3:PutObject"
                ]
            }
        ]
    }
CloudFrontCreateInvalidation
    {
        "Version": "2012-10-17",
        "Statement": [
            {
                "Sid": "VisualEditor0",
                "Effect": "Allow",
                "Action": "cloudfront:CreateInvalidation",
                "Resource": "*"
            }
        ]
    }
BlogS3Access
{
"Version": "2012-10-17",
"Statement": [
{
"Effect": "Allow",
"Action": "s3:ListAllMyBuckets",
"Resource": "arn:aws:s3:::*"
},
{
"Effect": "Allow",
"Action": [
"s3:ListBucket",
"s3:GetBucketLocation"
],
"Resource": "arn:aws:s3:::www.ronnieeichler.com"
},
{
"Effect": "Allow",
"Action": [
"s3:GetObject",
"s3:PutObject",
"s3:DeleteObject"
],
"Resource": "arn:aws:s3:::www.ronnieeichler.com/*"
}
]
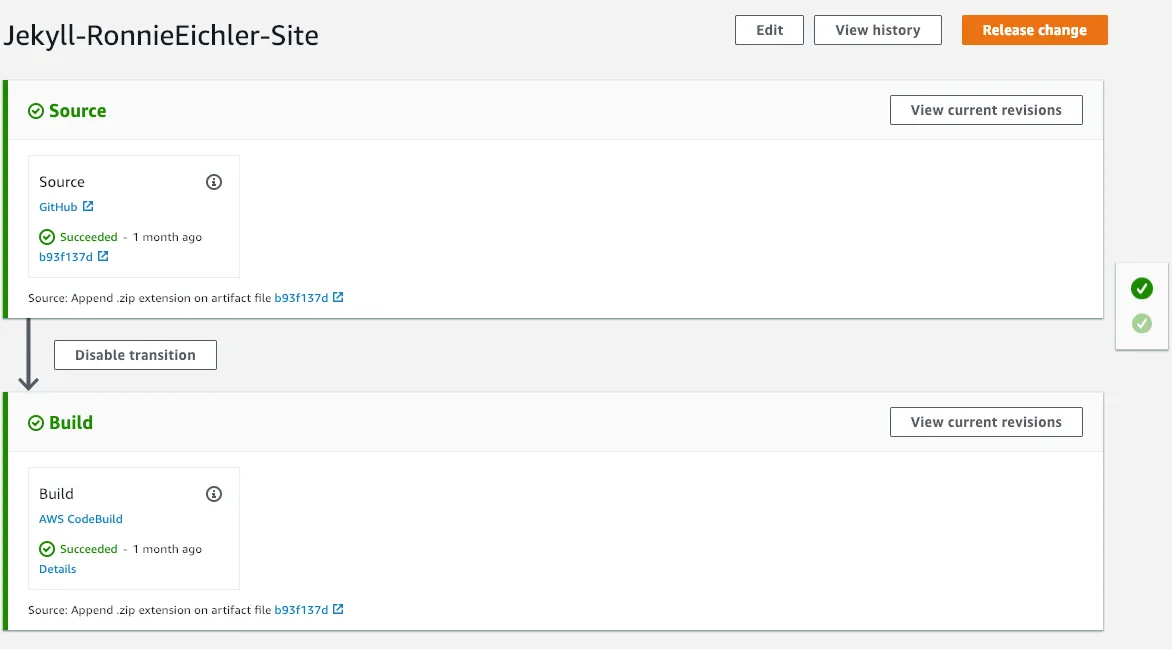
}Creating the pipeline
Once the build project is in place, you can create your CodePipeline. As I mentioned earlier, it’s just two stages (source and build). Basically, all CodePipeline is doing is monitoring for a new commit to GitHub (or whatever you’re using) and then triggering the build. I used the AWS console to create my pipeline, here is what mine looks like:
The service role for the pipeline was created by the console when I created the pipeline. Nothing special here.
Putting it all together
Now for the test! I’m going to commit this new post from my laptop, and I should see it flow through my pipeline.